
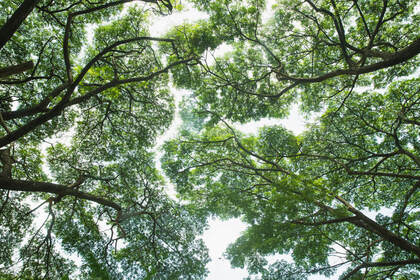
 Trees that fit like a jigsaw puzzle Trees that fit like a jigsaw puzzle Did you know that the human desire for personal space also occurs in the tree world? Some trees deliberately don’t touch each other. We know tree trunks don’t touch since it is evident when you get stump removal service. But tree tops not touching? Seriously?
What we call “touchy-feely” is called crown shyness in trees. Keep reading to find out more about crown shyness and its causes. The Origin of Crown Shyness Crown shyness, a sensation first seen in the ’20s, is when the crowns of trees don’t touch. The crown is the upper section of the tree where limbs sprout out from the main trunk. If you were strolling in the woods and looked up, you are looking at the canopy which a group of crowns is. Usually, when you look into the canopy, you see an intermixing of branches between the trees and the crowns. Not with crown shyness. The tops of the trees don’t touch. It is a peculiar phenomenon to see, and if you were to look at pics on the web, you might question: “Is this photoshopped or is crown shyness for real?” Straight up, crown shyness is for real. When you peek into the canopy, it seems like every tree has a halo of never-ending sky around its crown. Others have likened the look to a backlit jigsaw puzzle. Regardless of which description entices you, you get the idea. There is an exact boundary and separation (“no touch zone) around every tree crown. Crown Shyness Causes No one knows what causes crown shyness, but there are many theories, some of which are more believable than others: Disease and Insects – If one tree has an infection, then the spread of dangerous insects is a little harder to get to the next tree with crown shyness. Another hypothesis is that crown shyness stops the spread of some bacterial or fungal diseases. Photosynthesis – Photosynthesis is assisted by letting optimal light levels enter the canopy via the empty spaces around every crown. Trees grow in the path of light, and when they detect the shade from nearby tree limbs, their growth is stopped in that direction. Tree Damage – Trees sway in the wind and smack into each other. Twigs and limbs break during the impacts, damaging or disrupting growth nodules, making the gaps around every crown. Another theory is that crown shyness is a preventive measure. It lets trees play down or avoid this injury. 6/22/2019 Tips On Growing Prune Trees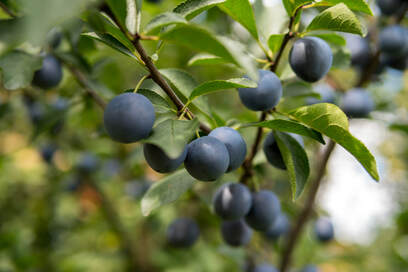 Damson Plum Tree Damson Plum Tree Want to grow some prune trees? Italian prune trees are a great option to grow. Italian prunes can develop as dwarf trees (10-12 feet) with meticulous pruning. They're wintering hardy and self-fertile. Also, the fruit can be dried, canned, or eaten fresh. Five years after planting prune trees will still produce. In early September, Italian prune trees are ready for harvest.
Tips on Growing Prune Trees When growing prune trees, pick a one or two-year-old from the nursery with a healthy root system and at least four well-spaced branches. The basic rule for an Italian prune tree is to plant early in the springtime, although if the soil is moist and the autumn conditions are mild, planting can happen in the fall. When picking a place for planting, keep away from any low-lying areas that could be vulnerable to freeing and pooling water. Dig the hole a bit wider and deeper than the trees root ball and put some bone meal in the bottom. Remove the plant from the pot. Examine the roots for any spoil parts that have to be trimmed off. Next, put the new tree in the hole, so it is equal from all sides. Put peat moss or mulch (found at many stump grinding businesses) mixed with soil and water around the plant. If you are planting more than one prune tree, make sure they are at least 12 feet from each other. Prune Tree Maintenance Once your prune tree is planted, tree care includes keeping four feet of space around the tree weed-free. A great idea is to use organic mulch around the tree. Organic mulch is excellent for suppressing weed growth. You don’t have to fertilize for up to three years. Once they start to fruit, fertilize per 1 square yard around the tree in the springtime. Be sure not to feed the tree too much. You can prune Italian prune trees at planting time. To keep their shape, trim shoots from the ground in the springtime and summertime, keeping the middle of the tree open for air circulation and letting the sun in. 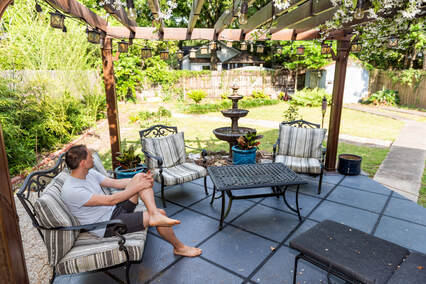 Your yard is the ideal place to spend time with friends and loved ones on nice summer days.
Though it's fantastic spending time basking in the sun, each yard must have space where loved ones and friends can chill in the shade. Here’s a look at some appealing ways to increase shade in your backyard. Pergola with Plants A pergola covered with plants can jazzy up any outdoor space. A vine-covered pergola offers shade and can be the ideal getaway on a hot summer day. There are lots of vibrant plants that look good on a pergola. A well-known favorite is morning glories. Other plants that are perfect for a pergola are yellow variegated ivy, lilac solanum, and clematis. A Distinct Canopy For years, folks have been putting up canopies in their outdoor spaces to have an area with shade. Though, you might want to expand on this standard option. For example, you can buy a canopy crafted with woven basket material. You’ll have shade for your patio table, a group of lawn chairs, or hammock. Another option is a triangular sail shade that’s simple to attach to three strong trees or poles. They are available in numerous colors and designs, offering a stylish cover for a chaise lounge or hammock. A retractable fabric canopy is the one to have if you want to regulate the amount of shade in your outdoor area. Retractable canopies are similar to curtains or drapes. Floating Screen A floating screen looks fabulous while giving you and your guest some shade. Floating screens are ideal since they don't block your view of the stars and sky. Overhead Patio Lattice Installing an overhead patio lattice is the perfect way to make a shady area while enhancing the overall appeal of your outdoor space. A lattice with a square, olive branch, or diamond design makes a charming pattern of shade and sunlight. Moreover, you can further enhance your lattice by planting wisteria, English ivy, or climbing hydrangea close by. These plants will coil around your lattice, creating a more captivating look. Keep your yard look captivating and clean by getting rid of any useless stump with professional stump removal service. 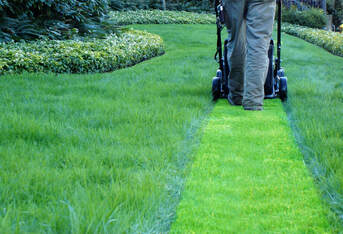 Examine your grass the next time you mow it. Are the grass blades evenly cut or are they frayed? If they're raggedy, it might be time to sharpen your mower blades. This blog article is all about tips on sharpening lawn mower blades.
Why Should I Do This? Sharp mower blades cut your grass most effectively, providing you with a healthy and neat lawn that is beautiful. Additionally, a sharp blade can reduce the amount of time you use mowing your lawn. This is a positive especially for those who would instead be doing something fun. Take care of your blade and mow your lawn the right way! When to Sharpen The amount of times you sharpen your mower blades is contingent on how frequently you mow your grass. If you mow your lawn every day, then you will want to hone your blades more frequent than someone who mows their grass every two weeks. As a general rule, sharpening your blade twice during the mowing season is ideal if you use your lawnmower to trim your lawn regularly. Various Sharpening Methods You can sharpen your lawn mower blade by hand. This is a solid option if you have a blade that's used gently for occasional trims. The first thing is to unfasten the spark plug and power source on your mower. This has to be done so that the mower can't come on while you're working. Undo the nut that links the blade to your mower, then take out the blade. You might want to use a vice to hold your blade so remains steady as you sharpen it using a metal file. Another method is to sharpen your mower blade by using a bench grinder. This is particularly useful if your blade has little dents in it due to hitting a stump. Hold the blade steady as you glide it back and forth on the bench grinder. Make sure to go along the angle of the blade's bevel. Just a suggestion: if you aren’t going to create something with your stump, get stump removal service. This vastly reduces the chance of your blades hitting it by accident. You can also use a belt sander to sharpen your lawnmower blade. Again, go back and forth against the belt sander while going against the angle of the blade's bevel. 6/1/2019 Planting Dwarf Trees In A Small Yard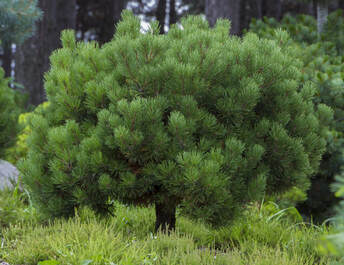 Dwarf Mountain Pine Dwarf Mountain Pine Do you believe trees have to grow as tall and as big as those in the forests? Wrong! Plenty of trees can bring splendor to your landscape, regardless of the size. And this isn’t about little bonsai trees! Keep reading for information on planting dwarf trees.
Trees for Small Yards Dwarf trees are ideal for small back or front yards, tiny gardens, or patio spaces. But don’t forget to leave plenty of room for the tree’s canopy to grow. To accomplish this, research the expected mature crown width and divide it by 2 — plan to plant your tree that distance from your home. For instance, a tree with an expected 40-foot crown spread has to be planted at least 20 feet away. Also, have mulch on hand to add a nice touch around your tree. You can pick some up at any Rochester stump grinding business. Landscape Trees
Dwarf Flower Trees
Trees Under 10 Ft.
|
AuthorWrite something about yourself. No need to be fancy, just an overview. Archives
December 2020
CategoriesAll Insects & Diseases Questions & Answers Tools & Safety Trees & Landscaping Tree Stump Basics |
- Home
- Services
- About
- Contact
-
Service Areas
- Rochester NY Stump Removal
- Brighton Stump Removal
- Chili Stump Removal
- Churchville Stump Removal
- East Stump Removal
- Fairport Stump Removal
- Farmington Stump Removal
- Gates Stump Removal
- Greece Stump Removal
- Henrietta Stump Removal
- Irondequoit Stump Removal
- North Gates Stump Removal
- Parma Stump Removal
- Penfield Stump Removal
- Perinton Stump Removal
- Pittsford Stump Removal
- Victor Stump Removal
- Webster Stump Removal
- Blog
Search by typing & pressing enter
 RSS Feed